
Welcome to our essential guide on wood polish abrasives. In the world of woodworking, achieving a flawless wood polish often hinges on the use of the right abrasives. This blog post aims to demystify the various types of wood polish abrasives and guide you in selecting the right ones for your projects.
Whether you’re a seasoned professional or a DIY enthusiast, understanding the role of abrasives in wood polish is crucial. From sandpaper to specialized abrasive pads, we’ll explore their key features, uses, and maintenance tips.
So, let’s dive right in and discover how to elevate your wood polish game with the right abrasives.
Understanding Wood Polish Abrasives:
When it comes to achieving a perfect wood polish, one tool that often gets overlooked is the humble abrasive. Yet, it’s an integral part of the process. But what exactly are wood polish abrasives and how do they work?
In simple terms, wood polish abrasives are tools used to smoothen out the rough patches on the wooden surface, preparing it for the application of wood polish. They work by scraping off small fragments from the wood surface, which helps in creating a uniform and smooth surface, that is ready for polish.
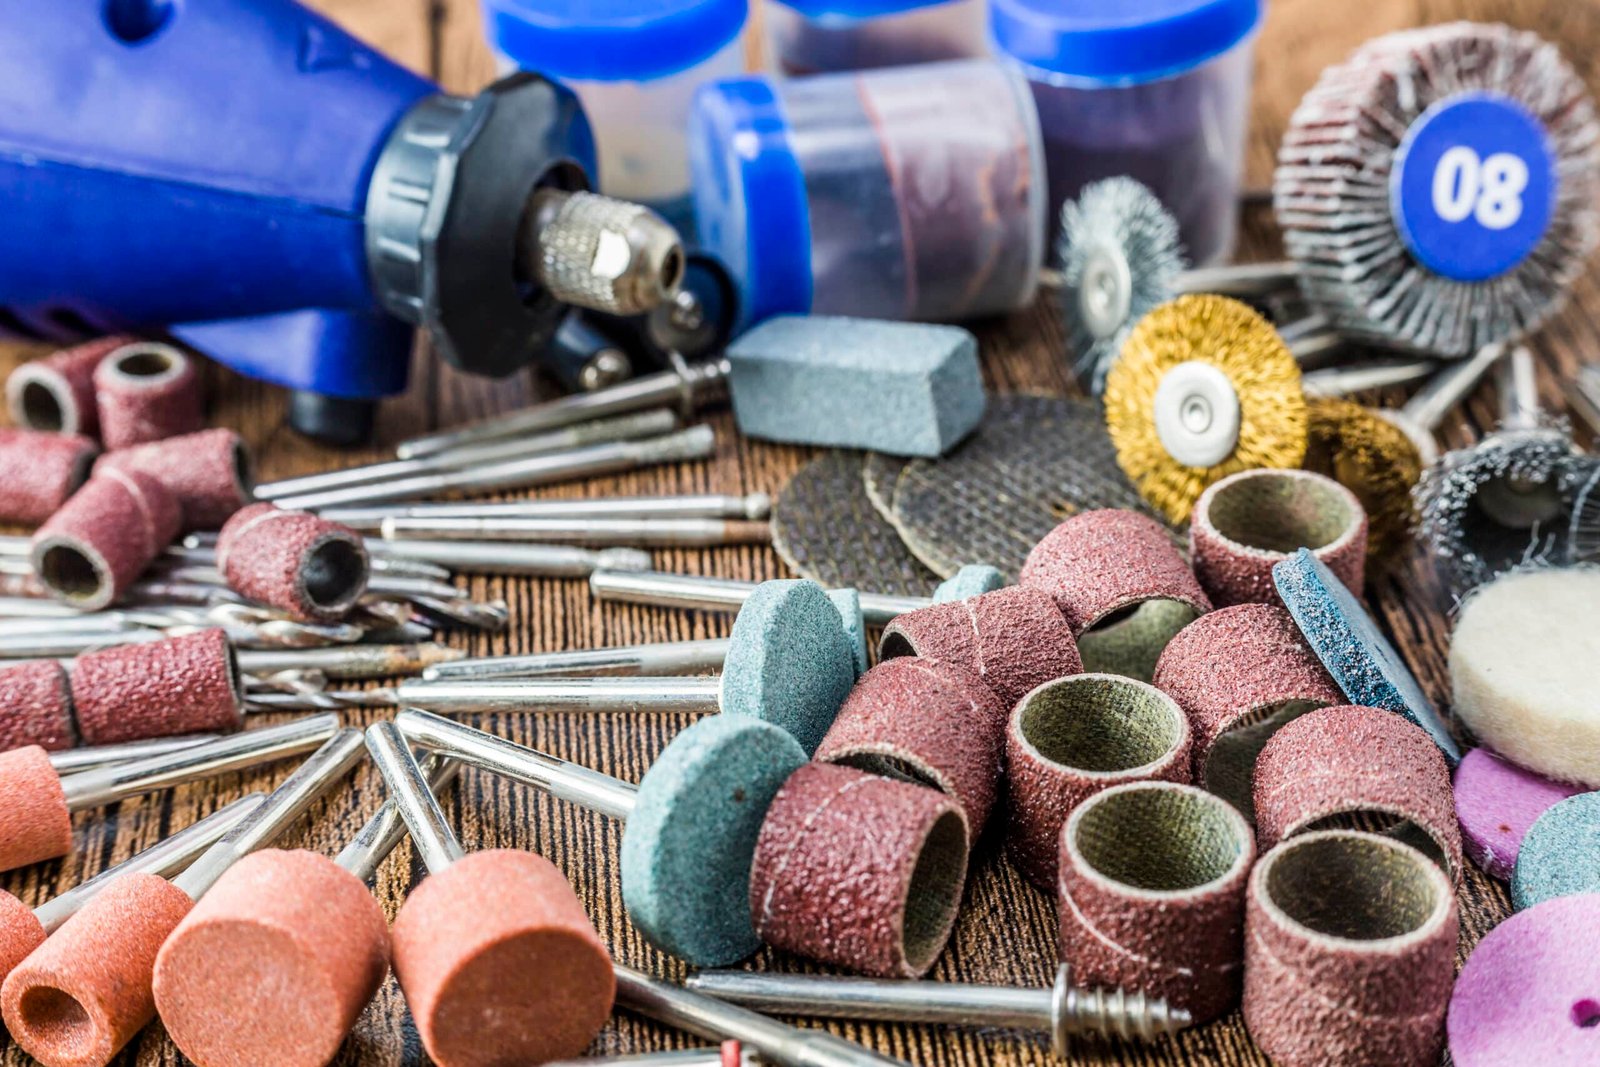
There are several types of abrasives used in woodworking, each with its own set of advantages and ideal uses. These include:
- Sandpaper: Perhaps the most well-known type of abrasive, sandpaper comes in a variety of grits, each suited for a different stage of the wood polishing process.
- Steel Wool: Used for finer work, steel wool is excellent for removing old paint or varnish, and for smoothing between coats of finish.
- Abrasive Pads: These are synthetic pads that can be used for a range of purposes, including light sanding and applying finishes.
On a microscopic level, abrasives work by creating tiny scratches on the wood surface. These scratches, though they might seem counterproductive, are essential in the polishing process. They create an even, slightly roughened surface that allows the wood polish to adhere better, leading to a smoother and more durable finish.
Understanding these basics of wood polish abrasives is the first step towards mastering the art of wood polishing. In the following sections, we’ll delve deeper into each type of abrasive and provide guidance on how to choose and use them effectively.
Factors to Consider when Choosing Wood Polish Abrasives

Choosing the right abrasive for your wood polishing project can make all the difference between a good result and a great one. However, with a variety of options available, making this choice can often be overwhelming. Here are a few key factors to consider:
- Type of Wood: Different woods have different hardness levels. Hardwoods, such as oak or maple, might require coarser abrasives to start with, while softwoods like pine might need finer abrasives.
- Desired Finish: The finish you aim to achieve also plays a role in the choice of abrasive. If you’re looking for a smooth and polished finish, you’ll need to use finer abrasives. On the other hand, if you want a slightly textured look, coarser abrasives may be used.
- Purpose of the Project: If you’re working on a restoration project and need to remove old paint or varnish, steel wool or coarser sandpaper may be needed. On the contrary, for a maintenance project or for applying a new layer of finish, a finer abrasive pad might be more suitable.
- Safety Considerations: Always remember that working with abrasives can produce dust and particles that can be harmful if inhaled or if they come in contact with your eyes. Always use appropriate safety gear, including dust masks and safety glasses.
By keeping these factors in mind, you can make a more informed decision when choosing the right abrasive for your wood polish project.
Detailed Overview of Different Types of Wood Polish Abrasives:
Understanding the specifics of each type of wood polish abrasive can significantly enhance the quality of your wood polish. Here, we present a detailed overview of the most commonly used abrasives in tabular form for easy reference.

Sandpaper
| Grit Level | Description |
| Coarse (60-80) | Used for initial sanding to remove major blemishes. |
| Medium (100-150) | Helps smooth the wood further. |
| Fine (220-400) | Used for final smoothing before applying the wood polish. |
Steel Wool
| Grade | Description |
| Coarse | Great for stripping off old paint or varnish. |
| Fine | Works well for smoothing between coats of finish or for buffing the final coat |
Abrasive Pads
| Usage | Description |
| Light Sanding | Can be used to lightly sand the surface of the wood. |
| Smoothing | Effective for smoothing between coats of finish. |
| Applying Polish | Can be used to apply the polish itself, providing a smooth and even application. |
Choosing the right abrasive for your project will depend on the specific requirements of the task at hand. In the next section, we will guide you through the correct techniques for using these abrasives to achieve the perfect wood polish.
Proper Techniques for Using Wood Polish Abrasives:
Using the correct technique when working with abrasives can make a significant difference in the outcome of your wood polishing project. Here are some general tips and tricks for each type of abrasive:
Sandpaper
- Always sand along the grain of the wood, not against it. This helps prevent scratches that can be hard to remove.
- Start with a coarser grit and gradually work your way up to finer grits. This helps ensure a smooth and even surface.
- Don’t apply too much pressure. Let the sandpaper do the work. Too much pressure can lead to deeper scratches and uneven surfaces.
Steel Wool
- Like with sandpaper, always work along the grain of the wood.
- Use gentle pressure and even strokes. Steel wool can remove a lot of material quickly, so take your time to avoid going too deep.
- Steel wool can leave tiny fragments behind, so make sure to thoroughly clean the surface before applying the finish.

Abrasive Pads
- Abrasive pads can be used in any direction, as they are less likely to leave noticeable scratches.
- They are excellent for smoothing between coats of finish. Just make sure the previous coat is completely dry before proceeding.
- When using a pad to apply polish, dip it into the polish and apply in a circular motion for an even coat.
Remember, practice makes perfect. The more you work with these abrasives, the more comfortable you’ll become, and the better your results will be.
Maintenance and Storage of Wood Polish Abrasives:
Proper maintenance and storage of your abrasives not only prolong their lifespan but also ensure they remain effective for your wood polishing tasks. Here are some tips on how to care for and store your abrasives:
Sandpaper
- After use, knock off any loose dust or particles from the sandpaper. This can be done by gently tapping it against a hard surface.
- Store sandpaper flat or neatly rolled up to prevent creasing. Creases can lead to uneven sanding.
- Keep it in a dry place, as moisture can ruin the adhesive that holds the grit in place.
Steel Wool
- Steel wool can rust if it gets wet, so always keep it in a dry place.
- If you’re using steel wool for multiple sessions, store it in a sealed container to prevent it from gathering dust and debris.
Abrasive Pads
- After use, rinse abrasive pads under running water until the water runs clear. This helps remove any wood particles lodged in the pad.
- Allow the pad to air dry completely before storing it.
- Store the pads flat in a dry location to maintain their shape and effectiveness.

By taking care of your abrasives, you not only ensure they’re ready for your next project, but you also save money in the long run by extending their useful life.
Case Study: Transforming a Wooden Furniture Piece with Wood Polish Abrasives:
To truly appreciate the transformative power of wood polish abrasives, let’s look at a case study where an old wooden chair was brought back to life.
- Inspection and Preparation: The chair, made of oak, showed signs of wear with several scratches and an old layer of varnish. The first step was to inspect the piece and prepare it for the transformation. All loose parts were tightened, and the surface was cleaned to remove any dust or debris.
- Stripping Old Varnish: Coarse steel wool was used to strip off the old varnish. The process was done carefully, ensuring not to gouge the wood and maintaining the direction of the grain.
- Sanding: Next, the chair was sanded using sandpaper. Starting with a coarse grit (80), the process was repeated with medium (150) and fine (220) grit sandpaper. This ensured a smooth, blemish-free surface ready for polishing.
- Polishing: After a final clean to remove any dust, a coat of wood polish was applied using an abrasive pad. The pad allowed for a smooth, even coat, and its soft texture prevented any new scratches. After the first coat dried, a light sanding with a fine abrasive pad was done before applying a second coat.
- Final Result: The final result was a beautifully polished chair that looked almost new. The wood grain was now more pronounced and the entire piece had a fresh, vibrant look.
This case study illustrates how, with the right techniques and tools, especially wood polish abrasives, you can transform a worn-out piece of furniture into something beautiful.
Conclusion and Final Tips:
Mastering the art of wood polish involves a deep understanding of not just the polish itself but also the tools that prepare the wood for it, especially the abrasives. These humble tools can make all the difference between a good and a great finish.
Remember these key points as you embark on your wood polishing journey:
- Understand Your Abrasives: Know the difference between sandpaper, steel wool, and abrasive pads, and when to use each for the best results.
- Consider the Wood: Different types of wood respond differently to abrasives. Always consider the type of wood you’re working with when choosing your abrasive.
- Safety First: Working with abrasives can produce dust and particles. Always wear appropriate safety gear.
- Practice Makes Perfect: The more you work with these tools, the better you’ll become at achieving the perfect finish.
- Maintain Your Tools: Proper care and storage of your abrasives will ensure they last longer and perform better.
We hope this comprehensive guide to wood polish abrasives has been informative and inspiring. Whether you’re a seasoned professional or a DIY enthusiast, the right abrasives and techniques can elevate your wood polish game. So, roll up your sleeves, get your abrasives ready, and let’s make some beautiful wood finishes together!